 ┌────────────∙·
·∙─────────┐
┌────────────∙·
·∙─────────┐
∙
│
·
│
subz3ro's
│
![]() ─┬─
──
│
─┬─
──
│
/┤DLiB│R/┤CK3R ││
SDL
│
│
│ ──
│
2.4.25
│
│
│
│
CONTENTS
∙
·
I. PROLOGUE
II. SCREEN LAYOUT
III. KEY REFERENCE
IV.
iNSTRUMENTS
V. EFFECTS
VI. SONG VARiABLES
VII. GETTiNG STARTED
VIII.
USEFUL TiPS
IX. KNOWN PROBLEMS
X. EPiLOGUE
┌────────────────────────∙∙
∙
∙ I.
PROLOGUE
∙
∙
·∙─────────────────┘
AdLib tracker is a 9-channel FM tracker for the
OPL2-compatible
chips found on most
sound cards.
A few years ago, there was a huge variety of
AdLib trackers.
The most common were:
Zwerg Zwack/Chicken's HSC-Tracker,
Jens-Christian Huus' EdLib,
Shayde's Reality AdLib Tracker,
Erik Pojar's Surprise! AdLib Tracker,
and the latest piece of
cake - Conqueror's Amusic.
This new way of AdLib tracking was just that
missing part in scene,
splitting the two
different worlds: a world of ugly CMF shit,
as Chicken used to say,
and a world of sample based trackers, such as
FastTracker or Impulse
Tracker.
The above trackers became pretty popular and
were used to produce
very nice FM music, short on size but high on
quality. Such tunes were
included in many BBS intros and demos.
Unfortunately, the things
went wrong, and AdLib tracking has come to
fruition.
Nowadays, at the end of second Millennium, i
decided to revive this part
of tracking history. Ladies and gentlemen,
subz3ro is proud to present
you a brandnew AdLib tool - /┤DLiB TR/┤CK3R
][.
You may probably ask WHY? Let me use the words
of Jens-Christian Huus,
one of the most common people in C64 and AdLib
programming, the author
of EdLib:
"People begun to actually hate FM sounds.
The arrival of GUS and AWE32
made wavetable techniques very popular and
indeed it sounds very good,
but there are some things in the old FM
standard that is unique.
You can't fiddle with samples in the same way
as you can with FM.
I personally never quite liked sampling, i find
it downright boring.
With a FM chip it is like on a C64; you have a
few parameters and
everything you do has to be done within these
parameters.
These boundaries makes it funny to make music,
to see how far you can
actually push AdLib. To do sounds on FM
requires expertice but
if you're good at it, almost any instrument can
be reproduced properly,
except perhaps drums."
HiGHLiGHTS
──────────
■ features best available software OPL3
playback to this date
■ supports 4-op instruments, melodic and
percussion instruments
■ supports up to 255 instruments, 128
patterns, 128 order list entries,
89 effect commands, and 24 extended
commands
■ features 2 effect columns and instrument
macro-definitions
■ loads following song formats:
A2M (AdT2)
A2P (AdT2) [pattern]
A2T (AdT2) [tiny module]
N1/ AMD (Amusic)
CFF (BoomTracker 4.0)
DFM
(Digital-FM)
N2/ FMK (FM-Kingtracker)
HSC
(HSC AdLib Composer / HSC-Tracker)
MTK (MPU-401
trÆkkεr)
RAD (Reality AdLib
Tracker) {ver.1}
N3/ S3M (Scream Tracker 3.x)
N4/ SAT (Surprise! AdLib
Tracker) {ver.1,5,6}
N4/ SA2 (Surprise! AdLib Tracker 2.0) {ver.8,9}
N1/ XMS (XMS-Tracker)
NOTE
1
Because of bug in Amusic's (and its crack
XMS-Tracker's) replay routine,
the Arpeggio effect used to generate buggy
sounds. Since /┤DLiB TR/┤CK3R ][
ain't got a support for such buggy things, the
Arpeggio effect may differ.
NOTE
2
After conversion, the Tremolo and Vibrato
effects may sound different,
because FM-Kingtracker uses slow speed table
(not 100% emulated in AT2)
and
optional waveform definitions that are currently not supported.
Also the Retrig Note effect is slightly
different (if i should be honest,
i really couldn't get any sense of Sami's frame
counting; all i could
do to make this effect sound way
"authentic" was the frame correction during
conversion phase--and this ain't perfect, though
:)
The OPL3 setting is ignored, Stereo setting is
accepted, Rhythm mode is
not supported, because it was incorrectly
implemented in earlier
versions of the tracker, and the author himself
stopped supporting it.
Also the pattern order list will be truncated to
128 if exceeds.
NOTE
3
Conversion of these (primarily sample based)
modules may not be 100% exact.
Therefore Slide Up/Down, Vibrato, and Tone
Portamento effects may be
inaccurate after importing to /┤DLiB TR/┤CK3R
][.
Anyway, some experimental methods are used to
fix up the fine-tuning
and frequency slide based Scream Tracker's
effects during
conversion phase (experimental understand as
"non-perfect" :)
Note that the optional vibrato/tremolo waveforms
are not supported.
Also the pattern order list will be truncated to
128 if exceeds.
NOTE
4
Since Surprise! AdLib Tracker uses non-standard
Volume Slide procedure
in replay routine, Volume Slide based effects
may differ after importing
to /┤DLiB TR/┤CK3R ][. Anyway, an
experimental method to fix up
this difference is used during conversion phase
(blabla, same as above :)
The special arpeggio is also currently not
supported (anyway, there are
no SA2 modules using that feature, afaik :)
■ loads following instrument formats:
A2i (AdT2)
A2F (AdT2) [w/fm-register
macro]
CiF (BoomTracker 4.0)
FiN (FM-Kingtracker)
iNS (HSC-Tracker/RAD-Tracker,
SAdT, Amusic/AdLib instrument)
SBi (Creative Labs FM
instrument)
SGi (Sound Generator 3.0)
Note that the type of "ins" file can
be set up in configuration file
if neccessary (see option
"force_ins").
■ loads following bank formats:
A2B (AdT2)
A2W (AdT2) [w/macros]
BNK (AdLib instrument bank)
{ver.1.0}
FiB (FM-Kingtracker)
iBK (Creative Labs FM
instrument bank)
■ The tracker supports block operations,
and has an instrument editor.
In addition, it features Tracing,
Debugging, and a MidiBoard.
■ The tracker reads many of its settings
from a configuration file.
It has strong support geared for row by
row tracing, pausing,
and playing from any line in a pattern.
┌────────────────────────∙∙
∙
∙ II.
SCREEN LAYOUT ∙
∙
∙∙─────────────────┘
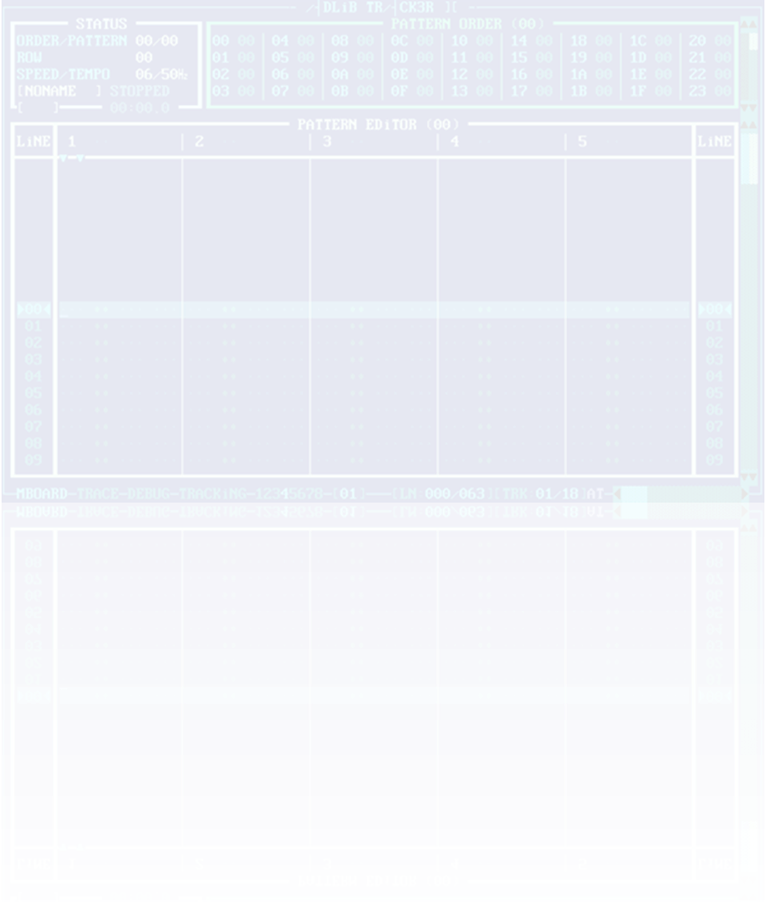
The main window of the tracker is roughly
composed of 5 parts:
A. The upper left hand window shows the
Status of the song
(paused, playing,
etc.), row number and order/pattern position,
current speed/tempo,
time playing and file information.
B. The upper right hand window is the
Pattern Order.
There the user can
build the order by which the patterns are played.
C. The main window is the Pattern Editor
with total count of 18/20 tracks,
5 tracks visible at a
time, where the user can compose the song,
enter the notes,
commands, number of instrument, and effects.
D. The Status Line at the bottom where
the user can keep track
of the different modes
and the active mode which is
highlighted (MBoard,
Trace, Debug, Track, Synth!), active octave,
active instrument, behavior
mode, a.o. The user should experiment
to gain familiarity
with different modes that can be activated.
E. The bottom window under Pattern Editor
shows the Volume Analyzer.
User have to scroll up
the rest of main screen to see it.
You can get all the
volume information (carrier and modulator
output level, overall
volume and global song volume,
approximate intensity
in dB) there.
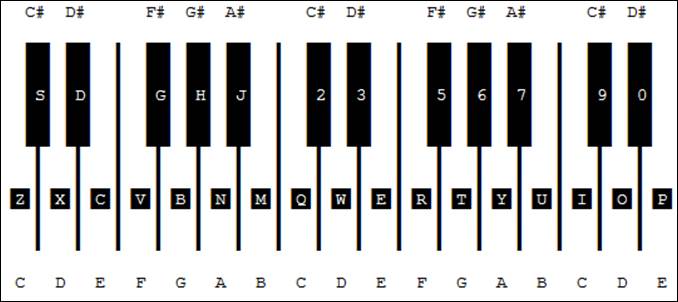
KEYBOARD
CONVENTiONS
────────────────────
[A]
means the 'a' key on your keyboard
[^A]
means the 'a' key + [Ctrl]
[Shift] A
means the 'a' key + [Shift]
[Alt] A
means the 'a' key + [Alt]
[Shift]
^A means the 'a' key + [Ctrl] + [Shift]
[Alt] ^A
means the 'a' key + [Ctrl] + [Alt]
In case of composite shortkeys, it is
recommended to use following
order of pressing the keys:
1st: [Ctrl]
(if any)
2nd: [Alt]
or [Shift] or [Tab] (if any)
3rd: "ordinary" key (if any :)
┌────────────────────────∙∙
∙
∙ III.
KEY REFERENCE ∙
∙
∙∙─────────────────┘
III/1.
GENERAL KEY REFERENCE
────────────────────────────
F1
Help
F2 (^S)
Save file
F3 (^L)
Load file
F4 (^A)
Toggle Nuke'm dialog
F5
Play
F6
Pause
F7
Stop
F8
Play song from current pattern or order
F9
Play current pattern or order only
[Ctrl] F8
@F8 from current line ┐
[Ctrl] F9
@F9 from current line ├ (Pattern Editor)
[Alt] F6
Single-play pattern ┘ (Shift
toggles trace)
[Alt] F5
@F5 ┐
[Alt] F8
@F8 ├ without
synchronization
[Alt] F9
@F9 ┘
[Shift] F2 Quick Save
[Shift] F3 Quick Load
[Shift]
F5
F5 with Trace
[Shift]
F6
Toggle Debug mode from position at cursor
[Shift]
F8
F8 with Trace
[Shift]
F9
F9 with Trace
[Shift]
Space
Toggle MidiBoard mode ON/OFF
^Space Toggle Note Recorder mode
ON/OFF (if
possible)
[Ctrl]
Home,End Skip to
previous/next pattern while Tracing
+,-
Same as above; play pattern from start
┌───────────────────────────────────────────────────────────────────────┐
│
WHEN iN NOTE RECORDER MODE │
├───────────────────────────────────────────────────────────────────────┤
│
^Left,^Right Select group of tracks for recording │
│
Enter Start recording from current
position (*) │
│
Space Toggle using custom instrument for
all tracks ┐ │
│
[Alt] Space Toggle using present instruments in
tracks ├ ref. │
│
MBoard keys Write notes to corresponding tracks │ (*) │
│
F8,F9 Toggle pattern repeat OFF/ON ┘ │
│
Backspace Clear note/instrument sequence in
tracks │
│ ^Backspace Clear complete note/instrument
columns │
│
Up,Down Rewind/Fast-Forward while
recording │
│
[Shift] Up,Down Increase/Decrease row correction for writing
notes │
│
[Shift] F6 Continue in Debug mode from position at
cursor │
│
F7 Stop recording and reset
starting position; │
│ current group of tracks can
be modified │
│
[Alt] 1..9,0 Toggle track channel ON/OFF (Shift toggles 1X) │
│
[Alt] R Reset flags on all tracks │
│
*
Reverse ON/OFF on all
tracks │
├───────────────────────────────────────────────────────────────────────┤
│
In case you need non-continuos track selection, you can choose │
│ from
already selected group a subset of tracks where notes will be │
│
written by manipulating track ON/OFF flags. │
└───────────────────────────────────────────────────────────────────────┘
┌───────────────────────────────────────────────────────────────────┐
│ iF
SONG iS PLAYED WiTH TRACE, iT CAN BE REMOVED WHiLE... │
├───────────────────────────────────────────────────────────────────┤
│ Enter Playback is paused and cursor stays on
position │
│ Esc Cursor jumps to last position and playback
continues │
│
[Shift] Esc Cursor stays on position and playback
continues │
└───────────────────────────────────────────────────────────────────┘
Note that playing with Trace and playing without
synchronization can be
set up in configuration file (see options
"trace_by_default"
and "nosync_by_default")
^Enter
Play next pattern according to order
^Left
(Up)
Rewind current pattern (with Trace)
^Right
(Down)
Fast-Forward (with Trace)
[Ctrl]{Shift} Up,Down Change playback speed up/down {fine
stepping}
[Ctrl]{Shift} Up+Down Reset playback speed {default speed}
[Ctrl][Alt] <hold down> Temporarily show Debug Info window
^B Toggle Message Board
window
^D Toggle Debug Info window
^Q Toggle Instrument Macro
Editor window
^G
Toggle Arpeggio/Vibrato Macro Editor window
^M Toggle Macro Browser
window
^F
Toggle Song Variables window
^H
Toggle Replace window
^I
Toggle Instrument Control panel
^E
Toggle Instrument Editor window
^O
Toggle Octave Control panel
^P
Toggle Pattern List window
^R
Toggle Remap Instrument window
^T
Toggle Transpose window
^X
Toggle Rearrange Tracks window
^1..^8
Quick-set octave
[Alt]
+,- (Up,Down) Adjust volume level of
sound output
[Alt] C
Copy
object to clipboard (with selection)
[Alt] P
Paste object from clipboard
[Alt] M
Toggle marking lines ON/OFF
[Alt] L
Toggle Line Marking Setup window
[Alt]
1..9,0
Toggle track channel ON/OFF (Shift toggles
1X)
[Alt] S
Set all OFF except current track (solo)
[Alt] R
Reset flags on all tracks
* Reverse ON/OFF on all tracks
F10 Quit program
F11 Toggle typing mode in
Pattern Editor (AT-►FT-►ST)
F12 Toggle line feed in Pattern Editor
[Shift] F12 Toggle jump to marked line in Pattern Editor
[Ctrl][Tab] [...] (*) Scroll Volume Analyzer section (if
necessary)
(*) Up,Down,PgUp,PgDown
III/2.
WAV RECORDER KEY REFERENCE
─────────────────────────────────
[Alt|Ctrl]{Shift} F11 Toggle WAV recording ON
[Alt|Ctrl]{Shift} F12 Toggle WAV recording OFF
┌──────────────────────────────────────────────────────┐
│ FUNCTiONALiTY
OF ALTERNATiVE KEYS
│
├──────────────────────────────────────────────────────┤
│ Alt Toggle normal recording mode │
│ Ctrl Toggle 'per track' recording mode │
│ Shift
Toggle Fade in / Fade out sound
processing │
├──────────────────────────────────────────────────────┤
│ POSSiBLE
COMBiNATiONS: Alt,Ctrl,Alt+Shift,Ctrl+Shift │
└──────────────────────────────────────────────────────┘
If 'per track'
recording mode is activated and song playback is stopped
you can
exclude/include corresponing tracks from/to being recorded
with ordinary
track selection procedure:
[Alt] 1..9,0 Toggle track channel ON/OFF (Shift toggles 1X)
[Alt] S Set all OFF except current track (solo)
[Alt] R Reset flags on all tracks
III/3.
PATTERN ORDER KEY REFERENCE
──────────────────────────────────
Up,Down,Left,Right
Cursor navigation
PgUp,PgDn
Move up/down 32 patterns
Home,End
Move to the top/end of pattern order
Tab,[Shift]
Tab Move to
next/previous entry
Insert
Insert new entry
Delete
Delete entry
Backspace
Clear entry
^Space
Enter skip mark
^C
Copy entry to clipboard
^V
Paste entry from clipboard
+,-
Adjust entry
^F2
Save module in tiny format
Enter
Switch to Pattern Editor
Note that 80-FF pattern number range causes a
jump in pattern order.
syntax: order_number[hex](+80h); e.g.
"9A" jumps to order 1A
III/4.
PATTERN EDiTOR KEY REFERENCE
───────────────────────────────────
Up,Down,Left,Right
Cursor navigation
PgUp,PgDn
Move up/down 16 lines
Home,End
Move to the top/end of current pattern
Tab,[Shift]
Tab Move to
next/previous track
[Shift]
PgDn,PgUp (+,-) Move to next/previous pattern
[Shift]
Home,End Move fwd./bckwd.
to the first/last pattern
^Home,^End
Move to the end/top of previous/next pattern
Space
Advance to next row
^PgUp,^PgDn
Transpose note (block) halftone up/down
Backspace
Remove note or clear attributes
Insert
Insert new line (within track only)
Delete
Delete line (within track only)
[Shift]
Insert Insert
new line
[Shift]
Delete Delete
line
[Shift]
Enter
Toggle fixed and regular note
^K
Insert Key-Off
^C
Copy object at cursor to clipboard
^V
Paste object from clipboard
[Alt][Shift] P Paste object from clipboard to more
patterns
^Z Undo last operation (if
possible)
{Ctrl}
"[","]"
Change current instrument
[Alt] F2
Save current pattern to file
^F2
Save module in tiny format
[Shift] F3 Quick load recent pattern data
Enter
Switch to Pattern Order
NOTE
SYSTEM: C,C#,D,D#,E,F,F#,G,G#,A,A#,B(H)
VALiD
NOTE ENTRiES: C,C-,C#,C1,C-1,C#1...
┌──────────────────────────────────────────────────────────────────┐
│ BLOCK
OPERATiONS iN PATTERN EDiTOR
│
├──────────────────────────────────────────────────────────────────┤
│ Starting to mark a block: [Shift] Up,Down,Left,Right
│
│ When at least one row in one track is
marked, you can continue │
│ marking also with PgUp,PgDn,Home,End (Shift is still held
down!) │
│ Quick mark: [Alt] Q (1x-2x-3x) track ─> pattern ─>
discard │
│ Toggle last marked block: [Alt] B
│
├──────────────────────────────────────────────────────────────────┤
│ ^B Blank block (Insert blank block to
pattern) │
│ ^C Copy block (Copy block to
clipboard) │
│ ^D Delete block (Remove block from
pattern) │
│ ^N Nuke block (Clear block
contents) │
│ ^V Paste block (Paste block from clipboard
to pattern) (*) │
│ ^X Cut block (Combine both
Copy and Delete operation) │
├──────────────────────────────────────────────────────────────────┤
│ (*)
PASTE BLOCK OPERATiON VARiANTS │
│ ¯¯¯¯¯¯¯¯¯¯¯¯¯¯¯¯¯¯¯¯¯¯¯¯¯¯¯¯¯¯¯¯¯¯ │
│ "Paste block" operation has three
other functional variants │
│ with different key shortcuts for
activation: │
│ 1) [Alt]
V toggles "Mix block" operation, when block data │
│
from clipboard is applied without overwriting existing data; │
│ 2) [Shift]
^V toggles "Selective paste block" operation, │
│
when only block data from clipboard corresponding to current │
│
cursor position is being applied (i.e. note, instrument, │
│ 1st
effect or 2nd effect). │
│
3) [Alt][Shift] V toggles
"Flipped paste block" operation,
│
│ when block data from clipboard is applied
vertically flipped. │
│
│
│
MANiPULATiON WiTH FX VOLUME iNFORMATiON │
│ ¯¯¯¯¯¯¯¯¯¯¯¯¯¯¯¯¯¯¯¯¯¯¯¯¯¯¯¯¯¯¯¯¯¯¯¯¯¯¯ │
│ When there is block
marked, which contains some effect
│
│
commands carrying volume information, you can increase/decrease │
│
their values with +/- keys. │
│
Effect commands are processed with following priority: │
│ 1) Set instrument volume (Cxx), │
│ Force instrument volume (=xx) │
│ 2) Set modulator volume (9xx) │
│ 3) Set carrier volume (Ixx) │
│ 4) Set global volume (%xx) │
│
If effect command with higher priority has been processed, │
│
all remaining effect commands with lower priority are skipped. │
└──────────────────────────────────────────────────────────────────┘
III/5.
PATTERN LiST WiNDOW KEY REFERENCE
────────────────────────────────────────
Up,Down
Cursor navigation
PgUp,PgDn
Move up/down 20 patterns
Home,End
Move to the top/end of pattern list
Space
Mark/Unmark pattern
^Space
Unmark all marked patterns
[Shift]
^Space Reverse
marks on all patterns
[Alt] C
(^C)
Copy pattern to clipboard
[Alt] P
(^V)
Paste pattern from clipboard
[Shift]
^V
Paste pattern data from
clipboard
[Alt] V
Paste pattern name
from clipboard
^N Nuke current pattern
[Shift] ^N Nuke all marked patterns
^W
Swap marked patterns
[Shift]
^W
Swap marked patterns w/o names
[Shift]
Insert Insert
new pattern
[Shift]
Delete Delete
pattern
Enter
Rename pattern / Multiple paste
[Shift] F3 Quick load recent pattern data
Esc
Return to Pattern Editor or Pattern Order
III/6.
iNSTRUMENT CONTROL PANEL KEY REFERENCE
─────────────────────────────────────────────
Up,Down
Cursor navigation
PgUp,PgDn
Move up/down 16 instruments
Home,End
Move to the top/end of instrument list
Space
Mark/Unmark instrument
MBoard
keys <hold down> Preview instrument
Enter
Rename instrument
^C
Copy instrument to clipboard
[Shift]
^C
Copy instrument also with macro-definitions
^V
Paste instrument(s) from clipboard
[Shift]
^V
Paste instrument data from clipboard
[Alt] V
Paste instrument name(s) from clipboard
^W
Swap marked instruments
[Shift]
^W Swap
marked instruments w/o names
Tab
Toggle Instrument Editor window
[Shift]
Tab
Toggle Instrument Macro Editor window
[Shift] O Toggle operator mode 4OP / 2OP
[Shift]
M,B,S,T,C,H Toggle melodic and percussion (BD,SD,TT,TC,HH)
[Shift]
F2
Save instrument w/ fm-register macro to file
[Alt] F2
Save instrument bank to file
^F2
Save
instrument bank w/ all macros to file
[Shift] F3 Quick load recent instrument
data
Esc
Return to Pattern Editor or Pattern Order
III/7.
iNSTRUMENT EDiTOR WiNDOW KEY REFERENCE
─────────────────────────────────────────────
Up,Down,Left,Right,
Home,End
Cursor navigation
[Alt] <section hotkey> Jump to section
Tab
Jump to next setting
[Shift]
Tab
Jump to previous setting
+,-
(PgUp,PgDn) Adjust
value
Space
Select item
^Space
(opt.) Toggle ADSR preview ON/OFF
[Ctrl] "[","]" Change current instrument
[Ctrl][Shift] "[","]" Change macro speed
[Alt]{Shift} 1..4,0 Set operators for instrument preview (*)
MBoard
keys <hold down> Preview instrument
Enter
Toggle carrier/modulator/4OP slot settings
[Shift] O Toggle operator mode 4OP / 2OP
[Shift] M,B,S,T,C,H Toggle melodic and percussion (BD,SD,TT,TC,HH)
[Shift] F2 Save instrument w/ fm-register
macro to file
[Shift] Enter Copy values from carrier/modulator
slot
Esc
Return to Instrument Control panel
(*) [Alt] 1..4 Set solo operator
[Alt][Shift] 1..4 Toggle operator ON/OFF
[Alt] 0 Reset
III/8.
iNSTRUMENT MACRO EDiTOR WiNDOW KEY REFERENCE
───────────────────────────────────────────────────
Up,Down,Left,Right
Home,End
Cursor navigation
PgUp,PgDown
Move up/down 16 lines
Tab
(Enter)
Jump to next field in order
[Shift]
Tab
Jump
to previous field in order
[Shift]
Up,Down Synchronous
navigation within tables
[Shift]
Home,End Move to the
start/end of current line in table
^Left,^Right Switch between macro tables
[Shift] ^Left,^Right Navigate to start/end of macro table
^PgUp,^PgDown
Change current arpeggio/vibrato table
[Ctrl] "[","]" Change current instrument
[Ctrl][Shift]
"[","]" Change
macro speed
[Alt]{Shift} 1..4,0 Set operators for instrument
preview (*)
[Alt] ^C Copy
values from carrier column
[Alt] ^M Copy
values from modulator column
^C
Copy line in table (whole table respectively)
[Shift]
^C
Copy column in table
^V
Paste object from clipboard
^Enter
Paste data from instrument registers
[Shift]
Enter
Paste data to instrument registers
[Shift]
^Enter Paste
data from instrument registers w/ selection
Backspace
Clear current item in table
[Shift]
Backspace Clear line in table
+,-
Adjust value at cursor / current item in table
^Home,^End
Quick-adjust table length
[Shift]
^Home,^End Quick-adjust loop begin
position
[Shift]
^PgUp,^PgDown Quick-adjust loop length
Insert
Insert new line in table
Delete
Delete line in table
^E Toggle envelope restart
ON/OFF ┐
^N Toggle note retrigger
ON/OFF │
^Z Toggle ZERO frequency
ON/OFF │
[Alt] ^E,^N,^Z Reset all alike flags in table ├ FM-register
^Backspace
Toggle corresponding column ON/OFF │ table
[Alt] S
Set all OFF except current column │
[Alt] R
Reset flags on all columns │
*
Reverse ON/OFF on all columns ┘
\
Toggle current item (switch
types only)
Space
Toggle macro-preview mode
^Space
Toggle Key-Off loop within macro-preview mode
^F2 Save instrument bank w/
all macros to file
Esc
Leave Instrument Macro Editor window
(*) [Alt] 1..4 Set solo operator
[Alt][Shift] 1..4 Toggle operator ON/OFF
[Alt] 0 Reset
III/9.
APREGGiO/ViBRATO MACRO EDiTOR WiNDOW KEY REFERENCE
─────────────────────────────────────────────────────────
Up,Down,Left,Right
Home,End
Cursor navigation
PgUp,PgDown
Move up/down 16 lines
Tab
(Enter)
Jump to next field in order
[Shift]
Tab
Jump to previous field in order
[Shift]
Up,Down Synchronous
navigation within tables
^Left,^Right Switch between macro tables
[Shift] ^Left,^Right Navigate to start/end of macro table
^PgUp,^PgDown
Change current arpeggio/vibrato table
[Ctrl] "[","]" Change current instrument
[Ctrl][Shift] "[","]" Change macro speed
[Alt]{Shift} 1..4,0 Set operators for instrument
preview (*)
^C
Copy line in table (whole table respectively)
[Shift]
^C
Copy column in table
^V
Paste object from clipboard
Backspace
Clear current item in table
[Shift]
Backspace Clear line in table
+,-
Adjust value at cursor / current item in table
^Home,^End
Quick-adjust table length
[Shift]
^Home,^End Quick-adjust loop begin
position
[Shift]
^PgUp,^PgDown Quick-adjust loop length
Space
Toggle macro-preview mode
^Space
Toggle Key-Off loop within macro-preview mode
Esc
Leave Arpeggio/Vibrato Macro Editor window
(*) [Alt] 1..4 Set solo operator
[Alt][Shift] 1..4 Toggle operator ON/OFF
[Alt] 0 Reset
III/10.
iNSTRUMENT MACRO BROWSER KEY REFERENCE
──────────────────────────────────────────────
Up,Down,PgUp,PgDown
Home,End Cursor navigation
[Shift] Up,Down Move up/down in macro table
[Shift] Left,Right Move left/right in macro table
[Shift] PgUp,PgDown Move page up/down in macro table
[Shift] Home,End Move to the start/end of macro table
[Ctrl] Home,End Move to the start/end of line in
macro table
Enter Load selected macro data
^Enter (opt.) Load all macro data from bank
[Ctrl][Shift] "[","]" Change macro speed
MBoard keys <hold down> Preview instrument with selected macro data
Tab (opt.) Switch to Arpeggio/Vibrato Macro
Browser window
Esc Leave Instrument Macro
Browser window
III/11.
ARPEGGiO/ViBRATO MACRO BROWSER KEY REFERENCE
────────────────────────────────────────────────────
Up,Down,PgUp,PgDown
Home,End Cursor navigation
[Shift] Left,Right Move left/right in arpeggio table ┐
[Shift] PgUp,PgDown Move page left/right in arpeggio table │
^Left,^Right Move left/right in vibrato
table ├ refer to
^PgUp,^PgDown Move page left/right in vibrato
table │ (*)
[Shift]{Alt} Space Toggle arpeggio table selection (**)
│
[Ctrl] {Alt} Space Toggle vibrato table selection (**) ┘
[Shift] Home,End Navigate to start/end of arpeggio
table
^Home,^End Navigate to start/end of vibrato
table
[Ctrl] "[","]" Change current instrument
[Ctrl][Shift] "[","]" Change macro speed
MBoard keys <hold down> Preview instrument with selected macro data
Enter Load selected macro data
^Enter (opt.) Load all macro data from bank
[Shift] Esc Apply table indexes to current
instrument
Esc Leave Arpeggio/Vibrato
Macro Browser window
(*)
Key combination with Ctrl+Shift
applies action to both tables
(**) Alt key invokes no arpeggio resp. vibrato table (index value reset)
III/12. DEBUG iNFO WiNDOW KEY REFERENCE
───────────────────────────────────────
Up,Down,Left,Right
Home,End
Change current track
Tab Toggle details
Backspace Toggle pattern repeat
Space Enter Debug mode / Proceed
step (if
possible)
^Space Exit Debug mode
[Ctrl] Home,End Skip to previous/next pattern
+,- Same as above; play
pattern from start
^Enter
Play next pattern
according to order
^Left Rewind current pattern
^Right Fast-Forward
[Alt] 1..9,0 Toggle track channel ON/OFF (Shift toggles 1X)
[Alt] S Set all OFF except current
track (solo)
[Alt] R Reset flags on all tracks
*
Reverse
ON/OFF on all tracks
Esc Return to Pattern Editor
or Pattern Order
III/13.
REMAP iNSTRUMENT WiNDOW KEY REFERENCE
─────────────────────────────────────────────
Up,Down,Left,Right
Home,End
Cursor navigation
PgUp,PgDown
Move up/down 16 instruments
Tab
Jump to next selection
[Shift]
Tab
Jump to previous selection
MBoard
keys <hold down> Preview instrument
Enter
Remap
Esc
Return to Pattern Editor or Pattern Order
III/14.
REARRANGE TRACKS WiNDOW KEY REFERENCE
─────────────────────────────────────────────
Up,Down,Left,Right,
Home,End Cursor navigation
Tab Jump to next selection
[Shift] Tab Jump to previous selection
^PgUp,^PgDown Shift track at cursor up/down in
the track list
[Shift] ^PgUp,^PgDown Rotate track list from cursor
upside/downside
Enter Rearrange
Esc Return to Pattern Editor
or Pattern Order
III/15.
REPLACE WiNDOW KEY REFERENCE
────────────────────────────────────
Up,Down,Left,Right,
Home,End
Cursor navigation
Tab
Jump to next selection
[Shift]
Tab
Jump to previous selection
^K
Insert Key-Off in note column
^N
Mark "new" field to clear found item
^W Swap "to find"
and "replace" mask content
Delete,Backspace Delete current/previous character
^Backspace Delete "to find" or
"replace" mask content
[Shift] ^Backspace Delete content of both masks
Enter
Replace
Esc
Return to Pattern Editor or Pattern Order
III/16.
SONG VARiABLES WiNDOW KEY REFERENCE
───────────────────────────────────────────
Up,Down,Left,Right
Cursor navigation
[Alt] <section hotkey> Jump to section
Tab
(Enter)
Jump to next variable field
[Shift]
Tab
Jump to previous variable field
Space
Select item
^Enter Setup rows per beat for BPM
calculation
Esc
Return to Pattern Editor or Pattern Order
III/17.
FiLE BROWSER KEY REFERENCE
──────────────────────────────────
Up,Down,Left,Right,
PgUp,PgDown,Home,End Cursor navigation
\ (/ for Linux)
Navigate to root directory
Backspace Navigate to parent directory
[Shift] Backspace Navigate to program home directory
MBoard keys <hold down> Preview instrument (instrument files only)
Enter Choose file under cursor / read instrument
bank
Esc Leave without choosing
file
III/18. MESSAGE BOARD WiNDOW KEY REFERENCE
──────────────────────────────────────────
Up,Down,Left,Right,
^PgUp,^PgDown,
Home,End,^Home,^End Cursor navigation
PgUp,PgDown Move backwards/forwards over text
^Left,^Right Move word left/right
Backspace,Delete Delete character left/right
^Backspace,^T Delete word left/right
^K Delete characters to end
^Y Delete current line
Tab Indent current line
^Space Insert row for text at
cursor
[Shift] ^Backspace Delete row for text at cursor
Insert Toggle input and overwrite
mode
Enter Wrap line of text
Esc Return to Pattern Editor
or Pattern Order
III/19.
iNPUT FiELD KEY REFERENCE
─────────────────────────────────
Left,Right
Move left/right
Home,End
Move to the begin/end
^Left,^Right
Move word left/right
Backspace,Delete
Delete character left/right
^Backspace,^T
Delete word
left/right
^K Delete characters to end
^Y
Delete string
Insert
Toggle input and overwrite mode
+,- Increment/decrement
decimal or hexadecimal value
III/20.
MiDiBOARD KEY REFERENCE
───────────────────────────────
Use to enter notes while in MBoard mode (if not
already active,
Shift+Space
activates this mode if song is Stopped, or if song is Paused
with no Trace).
┌───────────────────────────────────────────────────────────────────────┐
│
WHiLE TRACKER iS iN MBOARD MODE
│
├───────────────────────────────────────────────────────────────────────┤
│
MBoard key copies note in note field, plays it, and advances
song │
│ to next row. If used with Left-Shift
key and line marking toggled ON, │
│ it advances song to next highlighted
row.
│
│ If used with Right-Shift key, it makes a fixed
note.
│
│ Space
plays row and advances song by one
row.
│
│ `
inserts Key-Off, releases playing note and advances to next
row. │
└───────────────────────────────────────────────────────────────────────┘
┌────────────────────────∙∙
∙
∙ IV.
iNSTRUMENTS ∙
∙
∙∙─────────────────┘
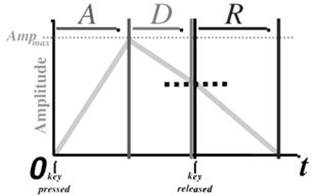
ATTACK
RATE
───────────
Indicates how fast the sound volume goes to
maximum.
1=slow, 15=fast. 0 means no attack phase.
DECAY
RATE
──────────
Indicates how fast the sound goes from maximum
level to sustain level.
1=slow, 15=fast. 0 means no decay phase.
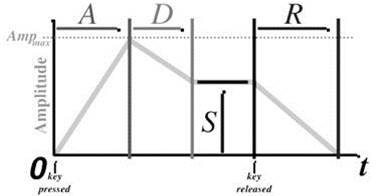
SUSTAiN
LEVEL
─────────────
Indicates the sustain level.
1=loudest, 15=softest. 0 means no sustain phase.
RELEASE
RATE
────────────
Indicates how fast the sound goes from sustain
level to zero level.
1=slow, 15=fast. 0 means no release phase.
OUTPUT
LEVEL
────────────
Ranges from 0 to 63, indicates the attenuation
according to the
envelope generator output. In Additive
synthesis, varying
the output level of any operator varies the
volume of its corresponding
channel. In FM synthesis, varying the output
level of carrier varies
the volume of its corresponding channel, but
varying the output of
the modulator will change the frequency spectrum
produced by the carrier.
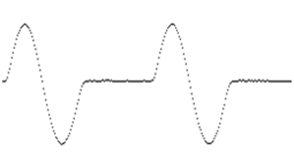
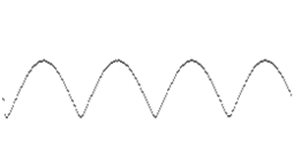
WAVEFORM
SELECT
───────────────
Specifies the output waveform type.
The first is closest to pure sine wave, the last
is most distorted.
|
[0] SiNE
|
[4] SiNE / EPO |
|
[1] HALF-SiNE
|
[5] ABS-SiNE / EPO
|
|
[2] ABS-SiNE
|
[6] SQUARE
|
|
[3] PULSE-SiNE |
[7] DERiVED SQUARE
|


KEY
SCALiNG LEVEL (KSL)
───────────────────────
When set, makes the sound softer at higher
frequencies.
With musical instruments, volume decreases as
pitch increases.
Level key scaling values are used to simulate
this effect.
If any (not zero), the diminishing factor can be
1.5 dB/octave,
3.0 dB/octave, or 6.0 dB/octave.
PANNiNG
───────
Gives you ability of controlling output, going
to left or right channel,
standing in the middle respectively.
The parameter corresponds either with carrier
and modulator, therefore
it is listed only once (within the carrier
slot).
FiNE-TUNE
─────────
This is not a hardware parameter.
Ranges from -127 to 127, it indicates the number
of frequency units
shifted up or down for any note playing with the
corresponding instrument.
The parameter corresponds either with carrier
and modulator, therefore
it is listed only once (within the carrier
slot).
FEEDBACK
STRENGTH
─────────────────
Ranges from 0 to 7, it indicates the modulation
depth
for the modulator slot FM feedback.
┌────────────╥─────┬─────┬─────┬─────┬─────┬─────┬─────┬─────┐
│ FEEDBACK
║
[0] │ [1] │ [2] │ [3] │ [4] │ [5] │ [6] │ [7] │
├────────────╫─────┼─────┼─────┼─────┼─────┼─────┼─────┼─────┤
│ MODULATiON
║
0 │π/16
│
π/8 │ π/4 │ π/2 │ π │
2π │ 4π │
└────────────╨─────┴─────┴─────┴─────┴─────┴─────┴─────┴─────┘
The parameter corresponds either with carrier
and modulator, therefore
it is listed only once (within the carrier
slot).
CONNECTiON
TYPE
───────────────
Frequency modulation means that the modulator
slot modulates the carrier.
Additive synthesis means that both slots produce
sound on their own.
|
[FM]
FREQUENCY MODULATiON
┌────────────┐
│ │
│ ╔════╗ │
╔════╗
P1 ───(+)───║ MO ╟──┴───(+)───║
CA ╟──> OUT
╚════╝
│ ╚════╝
│
│
P2 |
|
[ADDiTiVE
SYNTHESiS] AM
┌────────────┐
│ │
│ ╔════╗ │
P1 ───(+)───║ MO ╟──┴────┐
╚════╝
│
│
(+)──> OUT
│
╔════╗
│
P2 ─────────║ CA ╟───────┘
╚════╝ |
The parameter corresponds either with carrier
and modulator, therefore
it is listed only once (within the carrier
slot).
This parameter is also very important when making
4-op instruments,
because the combination of two instrument
connections specifies
the connection of the 4-op instrument as shown
below:
┌──────────╥────┬────┬────┬────┐
│ SLOT ║ M1 │ C1 │
M2 │
C2 │
├──────────╫────┼────┼────┼────┤
│ OPERATOR ║
1 │ 2 │ 3 │ 4
│
└──────────╨────┴────┴────┴────┘
|
[FM/FM]
┌────────────┐
│ │
│ ╔════╗ │
╔════╗
╔════╗
╔════╗
P1 ───(+)───║ M1 ╟──┴───(+)───║
C1 ╟───(+)───║ M2 ╟───(+)───║
C2 ╟──> OUT
╚════╝
│ ╚════╝
│ ╚════╝
│ ╚════╝
│
│
│
│
│
│
P2
P3 P4 |
|
[FM/AM] (*)
┌────────────┐
│ │
│ ╔════╗ │
╔════╗
P1 ───(+)───║ M1 ╟──┴───(+)───║
C1 ╟────┐
╚════╝
│ ╚════╝
│
│
│
│
│
P2 (+)──>
OUT
│
│
╔════╗
╔════╗ │
P3 ─────────║ M2 ╟──────(+)───║
C2 ╟────┘
╚════╝
│ ╚════╝
│
│
P4 |
|
[AM/FM] (*)
┌────────────┐
│ │
│ ╔════╗ │
P1 ───(+)───║ M1 ╟──┴──────────────────────────────────┐
╚════╝
│
│
│
│
╔════╗
╔════╗
╔════╗ │
P2 ─────────║ C1 ╟──────(+)───║
M2 ╟───(+)───║ C2 ╟───(+)──>
OUT
╚════╝
│ ╚════╝
│ ╚════╝
│
│
│
│
P3 P4 |
|
[AM/AM]
┌────────────┐
│ │
│ ╔════╗ │
P1 ───(+)───║ M1 ╟──┴───────────────────┐
╚════╝
│
│
│
│
╔════╗
╔════╗ │
P2 ─────────║ C1 ╟──────(+)───║
M2 ╟───(+)──> OUT
╚════╝
│ ╚════╝
│
│
│
│
│
P3 │
╔════╗
│
P4 ─────────║ C2 ╟──────────────────────┘
╚════╝ |
|
(*) REMARK
ABOUT 4OP CONNECTiONS FM/AM AND AM/FM Please note, that since order of 4OP
channels (hardware-wise) is 2) and 1), these two instrument connections are
swapped.', The preview diagrams in the Instrument
Editor window show actual order, but here this information is kept in
conformity with the official Yamaha YMF262 data specification to prevent
further confusion. |
TREMOLO
(AMPLiTUDE MODULATiON)
──────────────────────────────
When set, turns tremolo (volume vibrato) ON for the
corresponding slot.
The repetition rate is 3.7Hz, the depth is
optional (1dB/4.8dB).
ViBRATO
───────
When set, turns frequency vibrato ON for the
corresponding slot.
The repetition rate is 6.1Hz, the depth is
optional (7%/14%).
KEY SCALE
RATE (KSR)
────────────────────
When set, makes the sound shorter at higher
frequencies.
With normal musical instruments, the attack and
decay rate becomes faster
as the pitch increases. The key scale rate
controls simulation of
this effect. An offset (rof) is added to the
individual attack, decay,
and release rates depending on the following
formula:
actual_rate = (rate * 4) + rof
The "rof" values for corresponding
"rate" value and KSR state are shown
in the following table:
┌────────╥───┬───┬───┬───┬───┬───┬───┬───┬───┬───┬───┬───┬───┬───┬───┬───┐
│ %rate%
║
0 │
1 │
2 │
3 │
4 │
5 │
6 │
7 │
8 │
9 │
A │
B │
C │
D │
E │
F │
╞════════╬═══╪═══╪═══╪═══╪═══╪═══╪═══╪═══╪═══╪═══╪═══╪═══╪═══╪═══╪═══╪═══╡
│ [OFF]
║
0 │
0 │
0 │
0 │
1 │
1 │
1 │
1 │
2 │
2 │
2 │
2 │
3 │
3 │
3 │
3 │
├────────╫───┼───┼───┼───┼───┼───┼───┼───┼───┼───┼───┼───┼───┼───┼───┼───┤
│ [ON]
║
0 │
1 │
2 │
3 │
4 │
5 │
6 │
7 │
8 │
9 │
A │
B │
C │
D │
E │
F │
└────────╨───┴───┴───┴───┴───┴───┴───┴───┴───┴───┴───┴───┴───┴───┴───┴───┘
SUSTAiN
(ENVELOPE GENERATOR TYPE)
─────────────────────────────────
When set, the sustain level of the voice is
maintained until released.
When clear, the sound begins to decay
immediately after hitting
the sustain phase.
|
[OFF]
|
[ON]
|
FREQUENCY
DATA MULTiPLiER
─────────────────────────
Sets the multiplier for the frequency data
specified by block and
F-number. This multiplier is applied to the FM
carrier or modulation
frequencies. The multiplication factor and corresonding
harmonic types are
shown in the following table:
┌───────┬─────┬────────────────────────────────────┐
│ MULT.
│ x │ HARMONiC
│
╞═══════╪═════╪════════════════════════════════════╡
│ [0] │ 0.5 │ 1 octave below
│
│ [1] │ 1 │ at the voice's
specified frequency │
│ [2] │ 2 │ 1 octave
above
│
│ [3] │ 3 │ 1 octave and a
5th above │
│ [4] │ 4 │ 2 octaves
above
│
│ [5] │ 5 │ 2 octaves and a
Major 3rd above │
│ [6] │ 6 │ 2 octaves and a
5th above │
│ [7] │ 7 │ 2 octaves and a
Minor 7th above │
│ [8] │ 8 │ 3 octaves
above
│
│ [9] │ 9 │ 3 octaves and a
Major 2nd above │
│ [A] │ 10 │ 3 octaves and a Major 3rd
above │
│ [B] │ 10 │ ... │
│ [C] │ 12 │ 3 octaves and a 5th
above │
│ [D] │ 12 │ ... │
│ [E] │ 15 │ 3 octaves and a Major 7th above
│
│ [F] │ 15 │ ... │
└───────┴─────┴────────────────────────────────────┘
┌────────────────────────∙∙
∙
∙ V.
EFFECTS
∙
∙
∙∙─────────────────┘
[0xy] ARPEGGiO
──────────────
This command causes the note to quickly cycle
through three notes:
the note playing, a note 'x' halftones above,
and a note 'y' halftones above.
This causes an effect similar to old C64 chords.
Note that the song speed has to be greater or
equal to three
in order to perform arpeggio effect completely.
[1xx] FREQUENCY SLiDE UP
────────────────────────
This command slides the frequency up (pitch
bend).
Parameter 'xx' gives speed of slide.
[2xx] FREQUENCY SLiDE DOWN
──────────────────────────
This command slides the frequency down (pitch
bend).
Parameter 'xx' gives speed of slide.
[3xx] TONE PORTAMENTO
─────────────────────
This command is used together with a note and
will slide to its frequency.
Parameter 'xx' gives speed of slide.
If you specify 'xx' as '00' then the previous
value will be used.
[4xy] ViBRATO
─────────────
This command causes the frequency to oscillate
with depth 'y' at speed 'x'.
If you specify 'xy' as '00' then the previous
value will be used.
[5xy] TONE PORTAMENTO WiTH VOLUME SLiDE
───────────────────────────────────────
This command executes both Tone portamento and
Volume slide.
Parameter 'xy' gives speed of volume slide:
'x' is speed of slide up,
'y' is speed of slide down.
If you specify 'xy' as '00' then the previous
value will be used.
[6xy] ViBRATO WiTH VOLUME SLiDE
───────────────────────────────
This command executes both Vibrato and Volume
slide.
Parameter 'xy' gives speed of volume slide:
'x' is speed of slide up,
'y' is speed of slide down.
If you specify 'xy' as '00' then the previous
value will be used.
[7xx] FiNE FREQUENCY SLiDE UP
─────────────────────────────
This command slides the frequency up (pitch
bend) once per row.
Parameter 'xx' gives speed of slide.
[8xx] FiNE FREQUENCY SLiDE DOWN
───────────────────────────────
This command slides the frequency down (pitch
bend) once per row.
Parameter 'xx' gives speed of slide.
[9xx] SET MODULATOR VOLUME
──────────────────────────
This command sets the volume of modulator slot.
Value of 'xx' ranges from 0 to 3F (softest ->
loudest).
[Axy] VOLUME SLiDE
──────────────────
This command fades the volume up or down at the
given speed.
Parameter 'xy' gives speed of volume slide:
'x' is speed of slide up,
'y' is speed of slide down.
If you specify 'x' then 'y' is not used, and
vice versa.
[Bxx] PATTERN JUMP
──────────────────
This command causes the song to jump to order
'xx'.
This is often used to create looping songs.
If two 'Bxx' commands are given, then the
command in the
higher track will take effect.
[Cxx] SET iNSTRUMENT VOLUME
───────────────────────────
This command sets the absolute volume of the
instrument.
It is equal to Ixx command when instrument uses
FM connection,
otherwise both carrier and modulator volume is
updated.
Value of 'xx' ranges from 0 to 3F (softest ->
loudest).
[Dxx] PATTERN BREAK
───────────────────
This command signifies the end of the current
pattern, and also that
the next pattern should be played from row 'xx'.
If two 'Dxx' commands are given, then the
command in the
higher track will take effect.
[Exx] SET TEMPO
───────────────
This command changes the song tempo (also known
as BPM).
Parameter 'xx' gives hexadecimal value of
refresh rate in Hz.
If two 'Exx' commands are given, then the
command in the
higher track will take effect.
[Fxx] SET SPEED
───────────────
This command changes the song speed.
Parameter 'xx' gives how many frames to wait
before advancing row.
If two 'Fxx' commands are given, then the
command in the
higher track will take effect.
[Gxy] TONE PORTAMENTO WiTH FiNE VOLUME SLiDE
────────────────────────────────────────────
This command executes both Tone portamento and
Fine volume slide.
Parameter 'xy' gives speed of volume slide:
'x' is speed of slide up,
'y' is speed of slide down.
If you specify 'xy' as '00' then the previous
value will be used.
[Hxy] ViBRATO WiTH FiNE VOLUME SLiDE
────────────────────────────────────
This command executes both Vibrato and Fine
volume slide.
Parameter 'xy' gives speed of volume slide:
'x' is speed of slide up,
'y' is speed of slide down.
If you specify 'xy' as '00' then the previous
value will be used.
[Ixx] SET CARRiER VOLUME
────────────────────────
This command sets the volume of carrier slot.
Value of 'xx' ranges from 0 to 3F (softest ->
loudest).
[Jxy] SET WAVEFORM
──────────────────
This command changes the waveform of carrier or
modulator slot.
Parameter 'x' gives carrier and 'y' modulator
waveform type as following:
'0'-'7' means type of waveform,
'F' means "no change".
For more information see chapter IV, part
"Waveform select".
[Kxy] FiNE VOLUME SLiDE
───────────────────────
This command fades the volume up or down at the
given speed,
once per row.
Parameter 'xy' gives speed of volume slide:
'x' is speed of slide up,
'y' is speed of slide down.
If you specify 'x' then 'y' is not used, and
vice versa.
[Lxx] RETRiG NOTE
─────────────────
This command retriggs the note after 'xx'
frames.
If no note is specified, last given is used.
The lower is the interval, the faster is the
retrigger.
[Mxy] TREMOLO
─────────────
This command causes the volume to oscillate with
depth 'y' at speed 'x'.
If you specify 'xy' as '00' then the previous
value will be used.
Tremolo acts like vibrato, but changing the
volume instead of the pitch.
[Nxy] TREMOR
────────────
This command causes the volume to remain normal
for 'x' frames,
then fades the volume to zero for 'y' frames.
[Oxy] ARPEGGiO WiTH VOLUME SLiDE
────────────────────────────────
This command executes both Arpeggio and Volume
slide.
Parameter 'xy' gives speed of volume slide:
'x' is speed of slide up,
'y' is speed of slide down.
If you specify 'xy' as '00' then the previous
value will be used.
[Pxy] ARPEGGiO WiTH FiNE VOLUME SLiDE
─────────────────────────────────────
This command executes both Arpeggio and Fine
volume slide.
Parameter 'xy' gives speed of volume slide:
'x' is speed of slide up,
'y' is speed of slide down.
If you specify 'xy' as '00' then the previous
value will be used.
[Qxy] MULTi RETRiG NOTE
───────────────────────
This command retriggs the note after 'x' frames
with specified
volume change. Parameter 'y' gives type of
volume change:
'0' is None, '8' is
Unused,
'1' is -1,
'9' is +1,
'2' is -2,
'a' is +2,
'3' is -4,
'b' is +4,
'4' is -8,
'c' is +8,
'5' is -16, 'd'
is +16,
'6' is *2/3, 'e' is
*3/2,
'7' is *1/2, 'f' is *2.
If no note is specified, last given is used.
The lower is the interval, the faster is the
retrigger.
[Rxy] FREQUENCY SLiDE UP WiTH VOLUME SLiDE
──────────────────────────────────────────
This command executes both Frequency slide up and
Volume slide.
Parameter 'xy' gives speed of volume slide:
'x' is speed of slide up,
'y' is speed of slide down.
If you specify 'xy' as '00' then the previous
value will be used.
[Sxy] FREQUENCY SLiDE DOWN WiTH VOLUME SLiDE
────────────────────────────────────────────
This command executes both Frequency slide down
and Volume slide.
Parameter 'xy' gives speed of volume slide:
'x' is speed of slide up,
'y' is speed of slide down.
If you specify 'xy' as '00' then the previous
value will be used.
[Txy] FiNE FREQUENCY SLiDE UP WiTH VOLUME SLiDE
───────────────────────────────────────────────
This command executes both Fine frequency slide
up and Volume slide.
Parameter 'xy' gives speed of volume slide:
'x' is speed of slide up,
'y' is speed of slide down.
If you specify 'xy' as '00' then the previous
value will be used.
[Uxy] FiNE FREQUENCY SLiDE DOWN WiTH VOLUME SLiDE
─────────────────────────────────────────────────
This command executes both Fine frequency slide
down and Volume slide.
Parameter 'xy' gives speed of volume slide:
'x' is speed of slide up,
'y' is speed of slide down.
If you specify 'xy' as '00' then the previous
value will be used.
[Vxy] FREQUENCY SLiDE UP WiTH FiNE VOLUME SLiDE
───────────────────────────────────────────────
This command executes both Frequency slide up
and Fine volume slide.
Parameter 'xy' gives speed of volume slide:
'x' is speed of slide up,
'y' is speed of slide down.
If you specify 'xy' as '00' then the previous
value will be used.
[Wxy] FREQUENCY SLiDE DOWN WiTH FiNE VOLUME SLiDE
─────────────────────────────────────────────────
This command executes both Frequency slide down
and Fine volume slide.
Parameter 'xy' gives speed of volume slide:
'x' is speed of slide up,
'y' is speed of slide down.
If you specify 'xy' as '00' then the previous
value will be used.
[Xxy] FiNE FREQUENCY SLiDE UP WITH FiNE VOLUME SLiDE
────────────────────────────────────────────────────
This command executes both Fine frequency slide
up and Fine volume slide.
Parameter 'xy' gives speed of volume slide:
'x' is speed of slide up,
'y' is speed of slide down.
If you specify 'xy' as '00' then the previous
value will be used.
[Yxy] FiNE FREQUENCY SLiDE DOWN WiTH FiNE VOLUME SLiDE
──────────────────────────────────────────────────────
This command executes both Fine frequency slide
down and Fine volume slide.
Parameter 'xy' gives speed of volume slide:
'x' is speed of slide up,
'y' is speed of slide down.
If you specify 'xy' as '00' then the previous
value will be used.
[Z0x] SET TREMOLO DEPTH
───────────────────────
This command changes the Tremolo depth of all 36
operators.
Parameter 'x' gives depth:
'0' is 1dB,
'1' is 4.8dB.
[Z1x] SET ViBRATO DEPTH
───────────────────────
This command changes the Vibrato depth of all 36
operators.
Parameter 'x' gives depth:
'0' is 7%,
'1' is 14%.
[Z2x] SET MODULATOR'S ATTACK RATE
─────────────────────────────────
ADSR command. Parameter 'x' gives the value.
For more information see chapter IV, part
"Attack rate".
[Z3x] SET MODULATOR'S DECAY RATE
────────────────────────────────
ADSR command. Parameter 'x' gives the value.
For more information see chapter IV, part
"Decay rate".
[Z4x] SET MODULATOR'S SUSTAiN LEVEL
───────────────────────────────────
ADSR command. Parameter 'x' gives the value.
For more information see chapter IV, part
"Sustain level".
[Z5x] SET MODULATOR'S RELEASE RATE
──────────────────────────────────
ADSR command. Parameter 'x' gives the value.
For more information see chapter IV, part
"Release rate".
[Z6x] SET CARRiER'S ATTACK RATE
───────────────────────────────
ADSR command. Parameter 'x' gives the value.
For more information see chapter IV, part
"Attack rate".
[Z7x] SET CARRiER'S DECAY RATE
──────────────────────────────
ADSR command. Parameter 'x' gives the value.
For more information see chapter IV, part
"Decay rate".
[Z8x] SET CARRiER'S SUSTAiN LEVEL
─────────────────────────────────
ADSR command. Parameter 'x' gives the value.
For more information see chapter IV, part
"Sustain level".
[Z9x] SET CARRiER'S RELEASE RATE
────────────────────────────────
ADSR command. Parameter 'x' gives the value.
For more information see chapter IV, part
"Release rate".
[ZAx] SET FEEDBACK STRENGTH
───────────────────────────
This command changes the Feedback strength of
current instrument.
Parameter 'x' gives the value.
For more information see chapter IV, part
"Feedback strength".
[ZBx] SET PANNiNG POSiTiON
──────────────────────────
This command changes the panning of current instrument.
Parameter 'x' gives position:
'0' is center,
'1' is left,
'2' is right.
[ZCx] PATTERN LOOP
──────────────────
Syntax: ZC0 - Set loopback point
ZCx -
Loop x times.
This pattern space-saving feature will cause the
pattern
to be looped 'x' times back to the last ZC0
command.
Note that you can only loop within the pattern,
and each track
has its own loopback information, so you are
supposed to have
corresponding ZC0 and ZCx commands in the same
track in order to operate.
If ZCx commands are put in both effect columns,
only the one in first
column will operate.
[ZDx] RECURSiVE PATTERN LOOP
────────────────────────────
Syntax: ZD0 - Set loopback point
ZDx -
Loop x times.
This command is recursive variant of ZCx effect
command.
It means that when such kind of loop is located
inside other "parent" loop,
it is proceeded any time it is passed by this
loop.
Note that using ZC0 instead of ZD0 command has
the same effect.
Please keep in mind that ZDx command should not
be used in combination
with ZCx command in other effect column,
otherwise it will cause an
endless loop.
[ZE0/ZE1] TOGGLE MACRO KEY-OFF LOOP
───────────────────────────────────
This command temporarily
turns on-or-off looping
of Key-Off
phase in macro-table for current instrument.
Parameter 'x'
gives the state to toggle:
'0' is OFF,
'1' is ON.
Note that
"temporarily" means that the change is valid until there will be
set different
instrument than is the current one, for which this command
is to be used.
[ZE2/ZE3] TOGGLE RESTARTiNG ENVOLOPE
WiTH TONE PORTAMENTO
─────────────────────────────────────────────────────────
This command
turns on-or-off restarting of ADSR envelope for current track.
It means, that
the note key will be retriggered for every row with non-empty
input in the
note column (rows where note culumn is empty are not affected).
Parameter 'x'
gives the state to toggle:
'2' is OFF,
'3' is ON.
[ZE4] PERFORM RESTART ENVELOPE
──────────────────────────────
This command
restarts ADSR envelope for current instrument.
[ZE5/ZE6] TOGGLE 4OP TRACK VOLUME LOCK
──────────────────────────────────────
This command
turns on-or-off 4OP Track Volume Lock.
If 4OP Track
Volume Lock is set, some of the volume effect commands
will work in
4OP mode instead of default (2OP) mode. This means,
that volume
attenuation is calculated according 4OP connection
of the 2 used
instruments in track 2) and 1), and you don't have to
manage
carrier/modulator output level to get desired volume level
during
playback.
Parameter 'x'
gives the state to toggle:
'5' is OFF,
'6' is ON.
Here is a
complete list of commands that are affected by this lock:
5xy/6xy, Axy,
Cxx, Gxy/Hxy, Kxy, Mxy, Rxy/Sxy, Txy/Uxy,
Vxy/Wxy,
Xxy/Yxy, ^xy, %xx
Please note
that when the 4OP Track Volume Lock is set for particular
4OP tracks,
setting of 'Volume Scaling' is ignored (it is mandatory ON).
[ZE7]
PERFORM BPM SLiDE USiNG >xx AND <xx COMMANDS
──────────────────────────────────────────────────
As description
invokes, this command is intended to be used together
with >xx and
<xx effect commands.
It will cause
the playback speed shift up/down by certain amount {Hz)
depending on
the speed of slide.
Parameter 'xx'
gives speed of slide.
[ZF0] RELEASE SUSTAiNiNG SOUND
──────────────────────────────
This command causes the track volume to fade
down immediately.
Note that it nulls current Attack rate, Decay
rate,
Sustain level, and Release rate.
[ZF1] RESET iNSTRUMENT VOLUME
─────────────────────────────
This command resets back to modulator and
carrier volume
defined in modulator and carrier slot of current
instrument.
[ZF2/ZF3] TOGGLE TRACK VOLUME LOCK
──────────────────────────────────
This command
turns on-or-off the Volume Lock for current track.
It means, that
the track volume will remain constant for entire track.
This constant
is updated when using volume effect commands,
or when using
new instrument.
Parameter 'x'
gives the state to toggle:
'2' is ON,
'3' is OFF.
[ZF4/ZF5] TOGGLE VOLUME PEAK LOCK
─────────────────────────────────
This command
turns on-or-off the Volume Peak Lock for current track.
It means, that
when performing a Volume Slide, the upper limit of track
volume will
remain lower or equal to volume level specified in carrier
and modulator
slot of corresponding instrument.
Note that lock
affects Volume Slide and Fine Volume Slide effects
as well as
Tremolo, Tremor and Multi Retrig Note effects.
Parameter 'x'
gives the state of lock to toggle:
'4' is ON,
'5' is OFF.
[ZF6] TOGGLE MODULATOR VOLUME SLiDES
────────────────────────────────────
This command toggles volume slide for modulator
slot only. If used together
with ZF7 effect command, it toggles volume slide
for both slots.
Note that command will affect Volume Slide and
Fine Volume Slide effects
as well as Tremolo, Tremor and Multi Retrig Note
effects.
[ZF7] TOGGLE CARRiER VOLUME SLiDES
──────────────────────────────────
This command toggles volume slide for carrier
slot only. If used together
with ZF6 effect command, it toggles volume slide
for both slots.
Note that command will affect Volume Slide and
Fine Volume Slide effects
as well as Tremolo, Tremor and Multi Retrig Note
effects.
[ZF8] TOGGLE DEFAULT VOLUME SLiDES
──────────────────────────────────
This command toggles default volume slides.
It means, that replay routine will distinguish
which slot (carrier or both)
to proceed from connection type (see chapter IV,
part "Connection type").
Note that command will affect Volume Slide and
Fine Volume Slide effects
as well as Tremolo, Tremor and Multi Retrig Note
effects.
[ZF9/ZFA] TOGGLE TRACK PANNiNG LOCK
───────────────────────────────────
This command enables the Panning Lock.
It means, that current panning position is
forced for entire track,
and can be updated only by ZBx effect command.
This command turns
on-or-off the Panning Lock for current track.
It means, that
current panning position is forced for entire track,
and can be
updated only by ZBx effect command.
Parameter 'x'
gives the state of lock to toggle:
'9' is ON,
'A' is OFF.
[ZFB] ViBRATO OFF
─────────────────
This command marks the end of Vibrato effect.
It will restore the last frequency before
Vibrato effect.
[ZFC] TREMOLO OFF
─────────────────
This command marks the end of Tremolo effect.
It will restore the last volume before Tremolo
effect.
[ZFD] FORCE FiNE ViBRATO (FORCE FiNE GLOBAL FREQ. SLiDE)
────────────────────────────────────────────────────────
This command has to be used together with 4xy,
6xy or Hxy (>xx, <xx)
effect
command. It will cause the Vibrato (Global Freq. Slide Up/Down)
effect to be
performed once per row instead of every frame.
Note that the switch is reset at the end of
effect.
[ZFE] FORCE FiNE TREMOLO (FORCE EXTRA FiNE GLOBAL FREQ. SLiDE)
──────────────────────────────────────────────────────────────
This command has to be used together with Mxy
(>xx, <xx)
effect
command. It will cause the Tremolo (Global Freq. Slide Up/Down)
effect to be
performed once per row (once per every four frames).
Note that the switch is reset at the end of
effect.
[ZFF] FORCE NO RESTART FOR MACRO TABLES
───────────────────────────────────────
1) This command can be used together with !xx
(@xx) effect command.
It will cause that the arpeggio
(vibrato) table is swapped
without restarting position. It
means that the current position
is maintained as the starting point
in new table.
2) This command can be used while new note is
triggered and the instrument
that is played is using FM-register
macro (arpeggio macro, vibrato
macro resp.) In such case the macro
is not restarted, which means that
the current position in FM-register
(arpeggio, vibrato resp.) macro
table is maintained.
[#0x] SET CONNECTiON TYPE
─────────────────────────
This command sets the connection type of current
instrument.
Parameter 'x' gives the value.
For more information see chapter IV, part
"Connection type".
[#1x] SET MODULATOR'S MULTiPLiER
────────────────────────────────
This command sets the modulator's multiplier of
current instrument.
Parameter 'x' gives the value.
For more information see chapter IV, part
"Frequency data multiplier".
[#2x] SET MODULATOR'S KSL
─────────────────────────
This command sets the modulator's scaling level
of current instrument.
Parameter 'x' gives the value.
For more information see chapter IV, part
"Key scaling level".
[#3x] SET MODULATOR'S TREMOLO
─────────────────────────────
This command sets the modulator's tremolo
on-or-off for current instrument.
Parameter 'x' gives the state:
'0' is OFF,
'1' is ON.
For more information see chapter IV, part
"Tremolo (Amplitude modulation)".
[#4x] SET MODULATOR'S ViBRATO
─────────────────────────────
This command sets the modulator's vibrato
on-or-off for current instrument.
Parameter 'x' gives the state:
'0' is OFF,
'1' is ON.
For more information see chapter IV, part
"Vibrato)".
[#5x] SET MODULATOR'S KSR
─────────────────────────
This command sets the modulator's KSR on-or-off
for current instrument.
Parameter 'x' gives the state:
'0' is OFF,
'1' is ON.
For more information see chapter IV, part
"Key scale rate".
[#6x] SET MODULATOR'S SUSTAiN
─────────────────────────────
This command sets the modulator's sustain
on-or-off for current instrument.
Parameter 'x' gives the state:
'0' is OFF,
'1' is ON.
For more information see chapter IV, part
"Sustain (Envelope generator)".
[#7x] SET CARRiER'S MULTiPLiER
──────────────────────────────
This command sets the carrier's multiplier of
current instrument.
Parameter 'x' gives the value.
For more information see chapter IV, part
"Frequency data multiplier".
[#8x] SET CARRiER'S KSL
───────────────────────
This command sets the carrier's scaling level of
current instrument.
Parameter 'x' gives the value.
For more information see chapter IV, part
"Key scaling level".
[#9x] SET CARRiER'S TREMOLO
───────────────────────────
This command sets the carrier's tremolo
on-or-off for current instrument.
Parameter 'x' gives the state:
'0' is OFF,
'1' is ON.
For more information see chapter IV, part
"Tremolo (Amplitude modulation)".
[#Ax] SET CARRiER'S ViBRATO
───────────────────────────
This command sets the carrier's vibrato
on-or-off for current instrument.
Parameter 'x' gives the state:
'0' is OFF,
'1' is ON.
For more information see chapter IV, part
"Vibrato)".
[#Bx] SET CARRiER'S KSR
───────────────────────
This command sets the carrier's KSR on-or-off
for current instrument.
Parameter 'x' gives the state:
'0' is OFF,
'1' is ON.
For more information see chapter IV, part
"Key scale rate".
[#Cx] SET CARRiER'S SUSTAiN
───────────────────────────
This command sets the carrier's sustain
on-or-off for current instrument.
Parameter 'x' gives the state:
'0' is OFF,
'1' is ON.
For more information see chapter IV, part
"Sustain (Envelope generator)".
[&0x] PATTERN DELAY (FRAMES)
────────────────────────────
This command will delay the pattern 'x' frames.
If two '&0x' commands are given, then the
command in the
higher track will take effect.
[&1x] PATTERN DELAY (ROWS)
──────────────────────────
This command will cause a pause on the row for
effectively 'x' rows longer.
If two '&1x' commands are given, then the
command in the
higher track will take effect.
[&2x] NOTE DELAY
────────────────
This command will delay the note 'x' frames.
[&3x] NOTE CUT
──────────────
This command cuts the note (Key-Off will be
performed) after 'x' frames.
[&4x] FiNE-TUNE UP
──────────────────
This command fine-tunes frequency up.
If used together with a note, it overrides the
default note frequency
before the note is outputted (acts like
fine-tune parameter
included in instrument data).
Parameter 'x' gives frequency shift.
[&5x] FiNE-TUNE DOWN
────────────────────
This command fine-tunes frequency down as stated
above.
[&6x] GLOBAL VOLUME SLiDE UP
────────────────────────────
This command fades the global volume up at the
given speed.
Parameter 'x' gives speed of slide.
[&7x] GLOBAL VOLUME SLiDE DOWN
──────────────────────────────
This command fades the global volume down at the
given speed.
Parameter 'x' gives speed of slide.
[&8x] FiNE GLOBAL VOLUME SLiDE UP
─────────────────────────────────
This command fades the global volume up at the
given speed,
once per row.
Parameter 'x' gives speed of slide.
[&9x] FiNE GLOBAL VOLUME SLiDE DOWN
───────────────────────────────────
This command fades the global volume down at the
given speed,
once per row.
Parameter 'x' gives speed of slide.
[&Ax] EXTRA FiNE GLOBAL VOLUME SLiDE UP
───────────────────────────────────────
This command fades the global volume up at the
given speed,
once every four frames.
Parameter 'x' gives speed of slide.
[&Bx] EXTRA FiNE GLOBAL VOLUME SLiDE DOWN
─────────────────────────────────────────
This command fades the global volume down as
stated above.
[&Cx] EXTRA FiNE VOLUME SLiDE UP
────────────────────────────────
This command fades the volume up at the given
speed,
once every four frames.
It means that you can do four times more
accurate slide effects.
Parameter 'x' gives speed of slide.
[&Dx] EXTRA FiNE VOLUME SLiDE DOWN
──────────────────────────────────
This command fades the volume down as stated
above.
[&Ex] EXTRA FiNE FREQUENCY SLiDE UP
───────────────────────────────────
This command slides frequency up (pitch bend),
once every four frames.
It means that you can do four times more
accurate slide effects.
Parameter 'x' gives speed of slide.
[&Fx] EXTRA FiNE FREQUENCY SLiDE DOWN
─────────────────────────────────────
This command slides frequency down as stated
above.
[$xy] EXTRA FiNE ARPEGGiO
─────────────────────────
This command is a variant of 0xy (Arpeggio)
effect command.
It executes the arpeggio once every four frames.
It means that you can do four times more
accurate arpeggio effects.
Note that the song speed doesn't have to be
greater or equal to three
as it is in case of normal arpeggio.
[~xy] EXTRA FiNE ViBRATO
────────────────────────
This command is a variant of 4xy (Vibrato)
effect command.
It executes the vibrato once every four frames.
It means that you can do four times more
accurate vibrato effects.
[^xy] EXTRA FiNE TREMOLO
────────────────────────
This command is a variant of Mxy (Tremolo)
effect command.
It executes the tremolo once every four frames.
It means that you can do four times more
accurate tremolo effects.
[!xx] SWAP ARPEGGiO TABLE
─────────────────────────
This command temporarily swaps the arpeggio
table for current instrument.
Parameter 'xx' gives number of new table.
Note that the number of arpeggio table in
instrument macro-table
remains intact, and "temporarily"
means that the change is valid until
there is another note or instrument set.
[@xx] SWAP ViBRATO TABLE
────────────────────────
This command temporarily swaps the vibrato table
for current instrument.
Parameter 'xx' gives number of new table.
Note that the number of vibrato table in
instrument macro-table
remains intact, and "temporarily"
means that the change is valid until
there is another note or instrument set.
[=xx] FORCE iNSTRUMENT VOLUME
─────────────────────────────
This command is a variant of Cxx (Set Instrument
volume) effect command.
The difference is in modulator's role when
affecting volume, because
it scales the modulator volume according to 'xx'
value, no matter what is
the connection type of the instrument.
Note that the carrier volume is set as usual.
Value of 'xx' ranges from 0 to 3F (softest ->
loudest).
[%xx] SET GLOBAL VOLUME
───────────────────────
This command sets the global volume of song.
Value of 'xx' ranges from 0 to 3F (softest ->
loudest).
[>xx] GLOBAL FREQ. SLiDE UP
───────────────────────────
This command slides the frequency up (pitch
bend) in all tracks
from current to
last, if it’s not overridden by using another
'<xx' or
'>xx' in second effect column or one of succeeding tracks.
Parameter 'xx' gives speed of slide.
Note that you
can also use Fine or Extra Fine variant of this command
by putting
command switch 'ZFD' or 'ZFE' into second effect column.
[<xx] GLOBAL FREQ. SLiDE DOWN
─────────────────────────────
This command slides frequency down as stated
above.
[`xx] SET CUSTOM SPEED TABLE
────────────────────────────
This command
sets custom speed table for Vibrato/Tremolo effect,
which is
generated according given parameter 'xx':
'00'
Reset default speed table
'01-FF' Calculate custom speed table with parameters
table size, maximum value
and processing speed factor
┌────────────┬──────┬────────┬────────┐
│
PARAMETER │ SiZE │ MAX.
│
FACTOR │
╞════════════╪══════╪════════╪════════╡
│ [01]..[EF] │ 32 │
01..EF │ x1 │
│ [F0]..[F3] │ 32 │ FF
│
x1..x4 │
│ [F4]..[F7] │ 64 │ FF
│
x1..x4 │
│ [F8]..[FB] │ 128 │ FF
│
x1..x4 │
│ [FC]..[FF] │ 256 │ FF
│
x1..x4 │
└────────────┴──────┴────────┴────────┘
For information on custom speed tables
please refer to:
http://www.adlibtracker.net/files/techinfo.htm
┌────────────────────────∙∙
∙
∙ VI.
SONG VARiABLES ∙
∙
∙∙─────────────────┘
SONGNAME
────────
You can specify how should be the song called
here.
The maximal length of string is 42 characters.
COMPOSER
────────
You can specify who was the creative person that
made the song here.
The maximal length of string is 42 characters.
iNSTRUMENTS,
PATTERNS, ORDER LiST ENTRiES
─────────────────────────────────────────
These are just values for information about
number of common items used.
You cannot change them since they are calculated
by the tracker.
SONG
TEMPO
──────────
With range 1-255, you can specify what will be
the initial song tempo here.
The value is decimal, the unit used is
"frames per second" (Hz).
However, you can calculate the tempo also in
"beats per minute" (BPM)
with the following formula:
(tempo_in_Hz * 2.5) = tempo_in_BPM
SONG
SPEED
──────────
With range 1-FF, you can specify what will be
the initial song speed here.
The value is hexadecimal, the unit used is
"frames per row".
There is also an Update switch beside the song
speed field.
You can specify there, whether the song speed
should be reset to "initial"
when song loops back to order 0.
MACRODEF.
x
───────────
With optional range, you can specify what will
be the multiplying factor
for macro-definitions here.
i.e. 1 means that the macro commands will be
triggered once per frame,
2 means twice per frame
(speed-up is 2),
3 means three times per
frame (speed-up is 3), and so on.
TRACK
VOLUME LOCK
─────────────────
You can specify the initial Volume Lock state
here.
If Volume Lock is set, you can also set its
initial settings for all
available tracks in the Initial Lock Settings.
For more information see chapter V, part
"Lock track volume".
TRACK
PANNiNG LOCK
──────────────────
You can specify the initial Panning Lock state
here.
If Panning Lock is set, you can also set its
initial settings for all
available tracks in the Initial Lock Settings.
For more information see chapter V, part
"Lock track panning".
VOLUME
PEAK LOCK
────────────────
You can specify the initial Peak Lock state
here.
If Peak Lock is set, you can also set its
initial settings for all
available tracks in the Initial Lock Settings.
For more information see chapter V, part
"Lock volume peak".
4-OP
TRACK EXTENSiON
────────────────────
You can specify whether to use the 4-operator
track extension
on corresponding tracks here.
Note that this adjusts the number of tracks if
neccessary.
This mode is a bit complicated so it is recommended
to experiment to gain familiarity with making 4-op instruments :-)
TREMOLO
DEPTH
─────────────
You can specify the initial tremolo depth here.
See also chapter V, part "Tremolo".
ViBRATO
DEPTH
─────────────
You can specify the initial vibrato depth here.
See also chapter V, part "Vibrato".
PATTERN
LENGTH
──────────────
With range 1-256, you can specify what will be the
pattern length here.
Note that the pattern length value affects whole
song.
NUMBER
OF TRACKS
────────────────
With range 1-20, you can specify what will be
the number of tracks here.
Note that value above 18 automatically toggles
percussion mode ON.
PERCUSSiON
TRACK EXTENSiON (BD,SD,TT,TC,HH)
───────────────────────────────────────────
You can specify whether to use 5 percussion
tracks here.
Note that percussion mode automatically changes
the number of tracks to 20,
but you can decrease the value as neccessary
though.
This mode is slightly hard to use (particularly the
"SD/TT/TC/HH" tracks)
so it is not recommended unless you know how it works or gain
familiarity
with it after several experiments :-)
VOLUME
SCALiNG
──────────────
(iMPORTANT OPTiON)
You can specify whether to use volume scaling
mode here.
Volume scaling mode differs from default mode in
handling the volume
when performing effect commands. When in default
mode, the volume is set to
value requested in effect column whatever is the
base volume specified in
carrier or modulator cell of instrument.
When in volume scaling mode, any change of
volume with effect command is
calculated as scaled base volume of instrument.
iNiTiAL
LOCK SETTiNGS
─────────────────────
You can specify the initial settings of Panning
Lock, Volume Slide type,
Volume Lock, and Peak Lock for corresponding
track here.
┌────────────────────────∙∙
∙
∙ VII.
GETTiNG STARTED ∙
∙
∙∙─────────────────┘
Any piece of music written with the /┤DLiB
TR/┤CK3R ][ is built up
from patterns. Each pattern is built up from 1
to 18/20 tracks.
A pattern is 1 to 256 lines long. The line where
the cursor is always
the one you edit. If you need shorter patterns
and you don't want
to shorten the overall pattern length in song
variables,
use the Pattern Break effect command (Bxx).
A track is built up like this:
┌────┬───────────────────┬────
│LiNE│ 1
│ 2
├────┼───────────────────┼────
│ 37 │ ···
·· ··· ··· │ ···
│ 38 │ A#5
01 ··· ··· │ ···
│ 39 │ A-4
·· 330 ··· │ C-2
│ 3A │ ···
·· 300 ··· │ ---
│ 3B │ ···
·· 300 ··· │ ···
│ 3C │ ···
·· ··· ··· │ D#2
│ 3D │ D#1
02 ··· ··· │ ---
│ 3E │ C-2
01 ··· ··· │ ···
current ──>│ 3F │
C-4 01
C20 201 │ C-2
line │
│
│
│ │
│
└────┴───────────────────┴────
^ ^ ^ ^
│ │ │ │
│ │ │ └─
effect command 2
note ─┘ │ │
│ └─ effect command 1
│
└─ instrument
The C-4 is the note being played at pattern
position 3F,
01 is the instrument number, and the following
six digits are the
two effect commands, in this case, Set Volume to
20 Hex, and Frequency
Slide Down by 1 unit per frame. Remember that
values for instruments
and effects are always hexadecimal!
You can enter the note by switching into MBoard
mode while the song
is Stopped or while the song is Paused with no
Trace or by setting this
mode OFF (Shift+Space to toggle) then by just
typing the note into
the corresponding fields.
Likewise, you can either type in the instrument
number.
The instrument number corresponds to the active
instrument.
You can check the active instrumet at the bottom
of main screen or directly
in the Instrument Control panel.
If in MBoard mode, this will be entered
automatically when a note
is entered through the keyboard (MBoard keys).
Typing in the instrument number (if
"update_ins" option is ON) will affect
the numbers in following lines and the active
instrument in Instrument
Control panel. After you have edited all your
patterns, you have
to determine the pattern order. For that simply
use the Pattern Order
editor. Enter (while the song is Stopped or while
it is
Played with no Trace) will toggle the Pattern
Order editor.
Furthermore, you can define a restart position.
Here's an example:
Let's say you have entered three patterns
(numbers 0, 1 and 2) and
want to play the pattern 2 twice, then pattern 0
and finally
pattern number 1 three times. Afterwards the
music should start
from order 2 (with the pattern 0) again.
Edit the pattern order like this:
┌───────────────
│ 00 02 │ 04 01
│ 01 02 │ 05 01
│ 02 00 │ 06 82 <────
jump to order 2
│ 03 01 │ 07 80
└───────────────
^ ^
│ │
│ └─ pattern number (entry)
│
│
order number
To enter the notes /┤DLiB TR/┤CK3R
][ uses a piano-like keyboard layout
when in MBoard mode (see chapter III, part
"I" for the layout).
The program supports 8 octaves. You can see the
active octave in the bottom
of main screen or directly in the Octave Control
panel.
When both MBoard and Tracking mode are OFF, you
can type in the notes
into their corresponding fields.
┌────────────────────────∙∙
∙
∙ VIII.
USEFUL TiPS ∙
∙
∙∙─────────────────┘
TiP
1 The tracker is capable of highlighting
corresponding lines.
You
can toggle this mode on-and-off with Alt+M, and setup by Alt+L.
TiP
2 You can preview an instrument before
loading it.
In
the file open dialog or bank browser, use MBoard keys while
cursor is positioned on instrument you want to preview.
TiP
3 When in Debug mode, you can trace the
song row by row
with
Space key from Pattern Editor as well as from Debug info
window toggled by holding Ctrl+Alt. When the song is played
with
Trace, you can temporarily turn on Debug mode and process
row
by row playing with Space key directly from Debug info window.
TiP
4 When transposing patterns, it's sometimes
useful to keep some of
notes
intact from changes (e.g. drums).
You
can do that by holding Right-Shift key while putting notes
using
MBoard keys, or you can remark already put notes to-or-from
fixed
state in single steps or in blocks by Shift+Enter.
TiP
5 You can force /┤DLiB TR/┤CK3R
][ to behave like Scream Tracker or
FastTracker when typing in commands within the Pattern Editor
and
Macro Editor window.
┌────────────────────────┐
│ ADTRACK2.iNi SETTiNGS │
│
FOR DEFAULT MODE: │
┌──────────────────┬──────┤
“command_typing=” AND │
│ TYPiNG MODE │ FLAG │ “cycle_pattern=”
│
╞══════════════════╪══════╪════════════════════════╡
│
Adlib Tracker II │ AT │ 1/OFF │
│
FastTracker │ FT │
1/ON
│
│
Scream Tracker │ ST │
2/OFF │
└──────────────────┴──────┴────────────────────────┘
You
can set each of these modes as default mode on program start
with corresponding settings in
configuration file as shown
in the
above table. You can, however, switch over these modes
anytime later, using respective
combination of keys.
Please
note that when you set command typing to 0 (mOrOn),
you cannot switch over any of
these modes.
TiP
6 You are reminded of changes you have made
to the song.
In
the status window, a small diskette icon appears in case there
were
changes since last loading or saving.
TiP
7 You can get information about track
properties while Playing,
Debugging, Tracking or even if song is Paused in the
upper
area of Pattern Editor (beside corresponding track number).
┌─────┬──────────────────────────┐
│
() │ panning
Center │
│
( │
panning
Left │<─
if panning indicator
│
) │ panning
Right │
changes color, it means that
├─────┼──────────────────────────┤
the Panning Lock has been
│1'4OP│ first 4-op track
(main) │ activated/deactivated;
│2'4OP│ second 4-op
track │ for
more information,
│
BD │ Bass Drum
track │
see chapter V, effect ZBx,
│
SD │ Snare Drum
track │ and
effect ZF9, and also
│
TT │ Tom Tom
track │
chapter VI, part "Track Panning
│
TC │ Top Cymbal
track │
Lock"
│
HH │ Hi-Hat
track │
├─────┼──────────────────────────┤
│
M^ │ Modulator volume
slides │<─ for more information,
│
C^ │ Carrier volume
slides │ see chapter V, effects ZF6,
│
&^ │ Car w/ Mod
volume slides │ ZF7 and ZF8
├─────┼──────────────────────────┤
│
P+ │ Peak Lock
active │<─ for
more information,
│
V+ │ Volume Lock
active │ see chapter V,
effect ZF2,
└─────┴──────────────────────────┘
and effect ZF4
TiP
8 You are able to gain different setups for
corresponding directory
by
creating directory-specific configuration.
Simply place your "ini" file where you want to use corresponding
setup, and run the tracker from within this directory (it's useful
to
make a batch file there).
TiP
9 You can use shortkey [BackSpace] for
upper-dir and [\] for root
in
File Selector.
TiP
10 You can play your songs one after another by
pressing Shift+Enter
instead of Enter key in File Selector.
TiP
11 While working with 4-op tracks, marking
instruments
in
Instrument Control panel will choose a set of instruments
for
corresponding 4-op tracks. Two instruments will be then
always used as "current" instead of one.
You
can keep track of them in the Instrument Control panel as well
as in
the Status Line.
TiP
12 While working with 4-op tracks, panning works
within both
channels if you have used some AM connection at least in one
of
the two instruments. You are then able for example play some
operators in one channel and others elsewhere.
TiP
13 While working with instrument
macro-definitions, don't forget
to
paste appropriate instrument data to FM-register table
first
in order to use it. You can do that with ^Enter key, which
pastes default instrument data to current row.
TiP
14 While working with clipboard, you can use paste
same copied object
to more
pattern(s) quite easily. Simply copy the object to clipboard
as
usual, and press [Alt][Shift] P key.
Then
the Pattern List will appear, where you can select a single pattern
or
multiple patterns with [Space] as a destination.
Then
press Enter key to apply.
TiP
15 You can load a pattern to a multiple
destination--pattern(s) when
in
Pattern List and there are some marked patterns.
Simply mark one or several patterns with [Space] and load
desired pattern file.
TiP
16 If working with percussion mode (respect then
:) percussion
tracks SD/TT/TC/HH may stop responding. Go to the File Variables
window and set the percussion mode switch off-and-on.
After
1-3 retries the tracks should start responding again.
TiP
17 While testing/previewing an instrument within
Instrument Control,
Instrument Editor or bank browser, you can check the macro table
key-off
phase of this instrument. In order to do that,
hold
[Ctrl] key before releasing the MBoard key, and note(s) will
trail
in key-off phase until you release [Ctrl] key.
Furthermore, you can check the key-off phase with "key-off loop".
In
this case, hold the Ctrl+Alt keys pressed when releasing
the
MBoard key.
TiP
18 The tracker features both simple playback mode
and playback mode
with
synchronization. The advantage of synchro-playback is that
you
can gain authentic and accurate sound at any time and any point.
The
playback is synchronized everytime when it's neccassary, so
all
the playing effects, song tempo, song speed, song timer a.o. are
just
the same as they are when playing whole song from start.
The
disadvantage is that it sometimes takes awhile (maybe longer :)
when
playback synchronizes (depending on CPU and song structure)
Anyway, you can leave the sync-mode using [Alt] variant of playback
shortkey
(i.e. Alt+F5, Alt+F8 and Alt+F9) even if the song
is
already playing. Note that you can set up playing without
synchronization as the default action in configuration file (set
option "nosync_by_default" to ON).
TiP
19 You can play the current pattern in
single-playing mode.
It
means, that you are able to play patterns that are not signed
in
pattern order. The whole pattern is played with repeating then.
You
can toggle this playback mode with Alt+F6.
TiP
20 If working with macro-definitions, you can
disable one or more
columns in FM-register table. This is useful when you need
to
change only single or a few parameters (i.e. volume fading,
pitch
sliding) with macro-definitions and other parameters
with
pattern effects. This mode works similary as disabling tracks
in
Pattern Editor, but using Ctrl+Backspace for single
ON/OFF instead.
TiP
21 When making macro-instruments, it's sometimes
useful to reset
the
ADSR envelope several times during macro-cycle. You can do this
by
setting the note retrigger for appropriate row of macro-table;
Ctrl+N toggles ON the retrigger for corresponding row and Ctrl+Alt+N
resets flags on all rows.
TiP
22 You can control the playback from within the
Instrument Control
panel. Following commands are functional:
F5 Play
F6 Pause
F7 Stop
F9 Play current pattern or order only
[Ctrl] Home,End * Skip to previous/next pattern while Tracing
+,- * Same as above; play pattern from start
NOTE:
Commands marked with asterisk (*) work only while the name
of instrument is not being edited.
TiP
23 You can control current instrument directly in
Macro Editor window
using
Ctrl+[] keys. It is even possible to control current instrument
and octave while in
macro-preview mode.
TiP
24 When working with /┤DLiB TR/┤CK3R
][ native bank files (A2B, A2W),
you can force loading complete
bank instead of going to bank browser.
This can be done easily by
pressing Shift+Enter instead of Enter key
in File Selector.
TiP 25
All options from config file can be controlled also directly
from
command line. Syntax for usage is as following:
"adtrack2.exe [[/cfg:option] [...]]"
e.g.
"adtrack2.exe /cfg:sdl_screen_mode=2 /cfg:sdl_frame_rate=150"
TiP 26
When deleting notes in Note Recorder mode, you can fast-forward
or
rewind playback while deleting them. All you need to do is
press
Up or Down key while still holding the Backspace key.
Furthermore, you can delete all notes
within marked group of tracks
at once
with pressing Ctrl+Backspace.
TiP 27
When deleting notes in Note Recorder mode, you can fast-forward
or
rewind playback while deleting them. All you need to do is
press
Up or Down key while still holding the Backspace key.
TiP 28
When working with banks containing 4OP instruments, it may be
sometimes useful to put instrument data from one of the 2 paired
instruments only. This can be done by pressing Shift+Enter
instead
of Enter (which puts instrument data for complete 4OP pair).
┌────────────────────────∙∙
∙
∙ IX.
KNOWN PROBLEMS ∙
∙
∙∙─────────────────┘
There are no major issues known for this version
of program.
┌────────────────────────∙∙
∙
∙ X.
EPiLOGUE
∙
∙
∙∙─────────────────┘
HONEST
'THANK YOU' TO FOLLOWiNG PEOPLE
──────────────────────────────────────
(in random order)
Florian
Klaempfl and others [Free Pascal Compiler 2.6.4]
Simple
DirectMedia Layer [SDL 1.2.15]
Daniel F.
Moisset [SDL4Freepascal-1.2.0.0]
Alexey
Khokholov [NukedOPL3 1.6]
Haruhiko
Okomura & Haruyasu Yoshizaki [LZH algorithm]
Markus Oberhumer, Laszlo Molnar & John Reiser [UPX 3.91w]
(further in alphabetical order J)
Daniel Illgen
(insane/Altair)
David Cohen
(Diode Milliampere)
Dmitry Smagin
Ivan Tatarinov (IvanTAT)
Janwillem
Jagersma
Florian Jung
(Windfisch)
Maan M. Hamze
Mikkel Hastrup (encore)
Nick Balega
PissMasterPlus
Slawomir Bubel
(Malfunction/Altair)
Sven Renner
(NeuralNET)
∙
∙ Tyler Montbriand (Corona688) ∙
∙
│
└────────────────∙∙
∙∙──────────∙∙
∙∙─────────────┘